Wednesday, October 16, 2013

Warming David's House


Our good friend, David, recently bought a house in Hillcrest. He's spent the last several months feeling like he actually lives at Home Depot and completely renovated it from top to bottom. Among other things he put in an addition, replaced the flooring (and roof!), remodeled, painted, scrubbed and cut and has completed his vision. You'll quickly notice David's vision happens to be clean, modern, and mostly white.


See recipe below!


Although David scoffed when I made reference to a real life Pinterest house he did have some creative DIY uses that are worth mentioning!

The dining room table was a DIY project. David used the butcher block from Ikea to create the table top. Additionally he used the extra material from his curtains to create the placemats at the table as well.


The meal served that night was wonderful and the tofu in particular was fabulous. David's kindly provided the recipe at the bottom of this post.


Agedashi Tofu
Ingredients: 
- Soft tofu
- Potato starch
- Bonito flakes
- Green onions
- Soy sauce
- Dashi stock (see notes below)
- Mirin (sweet rice wine)
 - Rice bran oil

Directions:
For dashi sauce: 
- In a small saucepan, combine 2 part dashi stock, 1 part mirin, and 1 part soy sauce. Bring to boil, and set aside.

For tofu:
- Drain tofu and cut tofu into bite sized pieces that are identical in size. Place pieces onto several dry paper towels. Soft tofu is delicate, so be careful not to tear the tofu.
- Place several dry paper towels on top of the tofu, and place a heavy cutting board on top to get rid of excess moisture in tofu. Leave for 20 minutes, or until the paper towels are saturated in water.
- Lightly coat tofu pieces on all sides in potato starch, and fry in rice bran oil at around 400°C. For best results, coat the tofu in the potato starch immediately prior to frying. Fry until light brown and crispy on the outside. Drain fried tofu on paper plate to soak up excess oil.

To plate:
-Place three of four peices of tofu in a stack at the center of the bowl. Spoon heated dashi sauce over tofu. Garnish with minced green onion and bonito flakes. Serve immediately.

Notes:
-Some ingredients may be difficult to find in western supermarkets. Asian supermarkets will most likely be your best bet.
- Cornstarch may be substituted for potato starch, but the resulting texture will be slightly heavier. - There are different kinds of dashi stock. I prefer one that is branded as 'Hon-Dashi' which comes in a powder that you mix with water to create the stock.
- For a vegetarian version, omit the bonito flakes, and use a kombu (dried kelp) version of the dashi stock.

Sunday, October 13, 2013

New Ideas For Recycling Bottles


I cut this cute Stump Town coffee bottle this week and decided to plant this little succulent. I'm really loving the end result. I especially love bottles that have silk screening. Since the glass is pretty thin on this one it didn't take long to cut.  

If you want to cut bottles too check out my video tutorial below!
(Please like!) 


I also finally made a successful batch of soy candles! These are made from recycled sparkling water bottles and then I added vintage cigar labels from the 50's. They burn very cleanly and the end result costs just over $2 a candle. Not too shabby!


Tuesday, October 8, 2013

DIY Self-Watering Planter

This tutorial will explain how to make a self-watering planter for your home using old wine bottles. Note, you'll need to cut wine bottles to recreate this project like you see above, here's my bottle cutting tutorial here. You could also use plastic bottles and cut with scissors using the same method.

You'll need:
A plant
String
Pebbles
Rocks
Two wine bottles (cut)

Tips:  Use the pebbles to keep the string in place and the dirt from falling through. Play around with different size pebbles and rocks and find a size that works best for you. The string wicks the water up into the soil to keep things happy and hydrated!
I love this because the glass is colorful and everything is made from common household items. 
Good luck making yours!

Saturday, October 5, 2013

Pretending Like It's Fall...


It's October which means Starbucks can officially start making bank on all drinks pumpkin, ladies are pulling their cute fall sweaters out of the deepest black holes of their closets, and I'm sitting at my desk writing this sweatinglikecrazy because I just attempted a run in 80 degree heat. Despite the fact that San Diego may have the lamest fall of all time I'm determined to make the most of it. This week I made a butternut squash and spinach cream gratin that's seriously AMAZING! Here's the recipe, originally found on epicurious. Tomorrow I will continue to ignore the weather and am planning a red pepper, corn and leak soup. TAKE THAT SAN DIEGO!


What You Need:
  • 3 pounds fresh spinach, stems discarded, or 3 (10-ounce) packages frozen leaf spinach, thawed
  • 5 tablespoons unsalted butter plus additional for greasing pan
  • 3/4 cup finely chopped onion (1 small)
  • 3 garlic cloves, minced
  • 1 1/2 teaspoons salt
  • 3/4 teaspoon black pepper
  • Rounded 1/4 teaspoon freshly grated nutmeg
  • 1 cup heavy cream
  • 4 pounds butternut squash (2 large), peeled, quartered, and seeded
  • 1/2 ounce finely grated Parmigiano-Reggiano (1/4 cup)
  • Special equipment: an adjustable-blade slicer, I used a very sharp peeler and it worked just as well.
 I think the frozen spinach tastes great and saves hassle time. Make sure to squeeze out extra water after you thaw.


Melt 3 tablespoons butter in an 8-inch heavy skillet over moderately low heat, then cook onion and garlic, stirring, until softened, 3 to 5 minutes. Add onion mixture to spinach along with salt, pepper, nutmeg, and cream and stir to combine. 

Put oven rack in upper third of oven and preheat oven to 400°F. Butter a 3-quart shallow baking dish (13 by 9 inches; not glass). 

Cut squash to separate bulb section from solid neck section, then cut pieces lengthwise into 1/8-inch-thick slices with slicer. 

Layer squash and spinach mixture in baking dish, using about one fifth of squash and one fourth of spinach for each layer, beginning and ending with squash. Sprinkle top layer of squash evenly with cheese and dot with remaining 2 tablespoons butter, then cover directly with a sheet of parchment or wax paper. Bake until squash is tender and filling is bubbling, 25 to 30 minutes. Remove paper and bake gratin until browned in spots, 10 to 15 minutes, or broil 3 inches from heat, 2 to 3 minutes.

Enjoy!

Thursday, September 26, 2013

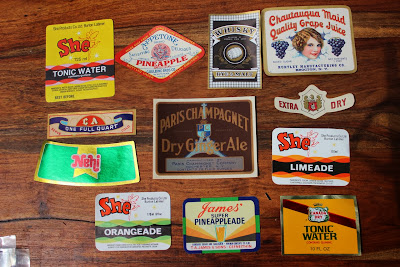
Vintage Labels


Today I purchased these awesome vintage labels from an Etsy shop. They're a combination of cigar labels and soda labels from the 1950's. I'm planning on making a batch of candles from recycled beer and wine bottles that I cut last week and thought these would be beautiful additions. I'll be gluing them onto the recycled bottles for a vintage flair.


When I took no prisoners embarked on my DIY rampage I thought I'd try my hand at candles. My first batch was incredibly anti climatic. My little pathetic flame just kind of withered and died without melting much of anything. Turns out you need different types of wax for different types of candles. So nice of my DIY Candle kit to mention that to me...

 It took a little bit of digging to figure out what the heck I should order so let me make it simple for you. I ordered 5 pounds of soy wax from Amazon that came highly rated and is perfect for container candles. Also, check out the table below for helpful candle/wax tips!


Good luck in your craft adventures!

Tuesday, September 24, 2013

DIY, How to Cut Bottles


There's something incredibly satisfying about turning something that would be thrown away into a practical, useful, and trendy product! Bottle cutting is relatively simple, inexpensive, and a lot of fun!
To complete the tutorial you'll need a bottle cutter. I recommend this one, Ephrem's Original Bottle Cutter Kit ($29)

Learn How to Cut Bottles By Watching The Short Tutorial Below!

Sunday, September 22, 2013

Bottle Cutting Tutorial

Bottle Cutting 101!

Everything you need to know about bottle cutting, condensed into 3 easy steps.

I recommend using Ephrem's Bottle Cutting Kit. It's simple, cheap ($29), and effective. Here's a link, Ephrem's Original Bottle Cutter Kit


This is my first tutorial so please let me know what you think! I'd love some feedback.

Extra notes,

The first step is to score the bottle. The score doesn't have to be deep. Make sure to apply consistent constant pressure. Once the score is done you need to apply heat. Have a cup of ice handy and light a candle. For 12 ounce beer bottles keep over the flame for 60 seconds. The thicker the glass the longer it needs to rotate over the flame. A champagne bottle should stay over the flame for about 2 minutes.

Next, rub ice around the score mark. You may hear cracking. This means it's working. If you see vertical stress cracks your bottle got too hot. I'd recommend discarding and starting over. Sometimes it takes a few tries to get it right! That's ok, and expected!

Continue to alternate between fire and ice until your bottle breaks in half. Try and maintain a firm grip because it happens very suddenly!

Good luck, and if you have questions, leave them in the comments below!

Friday, September 20, 2013

Beerology @ The Museum of Man

Tonight some friends and I attended Beerology at the Museum of Man in Balboa Park. The event sponsored by Green Flash, Alesmith, Dog Fish Head and a number of other micro brews was a resounding success and not just because of the all you can drink samples from some of the -Iamnotbiased- best breweries in the country, cupcakes with stout icing, and the cool museum atmosphere.

At the end of the night I asked if I could bring some bottles home...Somehow it took myself, three strapping gentlemen, and 4 large boxes to carry the 60 silk screened bottles to car.

I'm especially pleased with these "Enlightened Buddha Beer" bottles, although I have no idea what to do with them...They cannot be cut on the bumpy surface. Any ideas? Anyone?


Have you heard that the largest shelf in your house is the floor?


The man running the Left Coast booth also threw these guys into the boxes...I like to think it's because I'm cute...although he probably just didn't want to carry everything back.


Thursday, September 19, 2013

True Life: I'm a Bottle Hoarder


I knew I had reached a low when I caught my boyfriend trying to take a picture of me in my cute Friday night dress reaching into the recycling at Bottle Craft trying to fish out empty beer bottles...but you would do it too if you were making TRENDY tumblers, glasses, candles, and hurricanes out of beer bottles.

I've come to realize over the years that I have this tendency to overdo craft projects. One day I'm painting picture frames for my dorm room, 6 months later I'm applying for a seed capital loan to buy wholesale frames at Juniata. So it's really no surprise that every horizontal space in our apartment is occupied with beer bottles in various forms. I blame my friends and family for feeding my habits! YES, YOU READING THIS! It's probably YOUR FAULT! See just yesterday I got a Facebook comment from someone saying they had saved me a bunch of empties, including this 18 inch tequila bottle that wasn't yet entirely empty..so you know what that means.


Let's cut to the chase. Bottle cutting is a fantastic way to recycle or immortalize trendy bottles that you would otherwise just get rid of. The thought of bottles having a second life is appealing to me.

Get excited, tutorials to come.